Wednesday, August 31, 2011

Barbecue Chicken Pastry

This delicious Barbecue Chicken Pastry has a flaky layered pastry crust that is crispy and flaky tender at the same time. The filling is made with chicken meat cooked with some sauces, and it should be sweet and salty. I have made this a couple of times years ago before I started my blog. Made for my family and friends and everyone loved this. I was thinking of this again about two months back and have even made the filling and the container of filling has been sitting in the freezer for more than a month. Now seems like the perfect time to make this in time for the current theme going at Janine's blog, Not The Kitchen Sink, for "Aspiring Bakers #10 : Easy as Pie, August 2011". Today, is the last day for submission actually! :)


Let's get started on how to wrap the Barbecue Chicken Pastry, recipe is at the bottom of the post :

Water dough is kneaded to a smooth ball, weigh it and divide into 20 equal parts. Dough should be soft but not sticky.


The oil dough is very sticky. Flour your hands and divide into 20 equal parts.


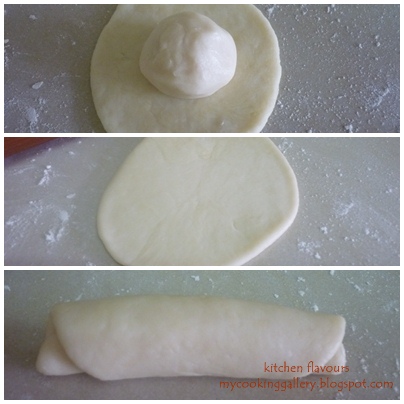
  1. Roll out water dough and place a ball of oil dough in the centre. Wrap the water dough around the oil dough.
  2. Flatten the dough.
  3. Roll it up like a swiss roll. Flatten the dough and roll it up again, repeat one more time.


  1. Flatten the dough and roll out into a thin round. Place about 1 tablespoon of filling in the center.
  2. Fold over the top and bottom to meet at the center, pinching the left sides together to seal. You may do this by placing the dough on the work surface or ...


  1. ..or by placing the dough on your palm. 
  2. Fold over the dough on the right, bringing towards the center.


  1. Pinch  and seal the sides of dough together, making sure there are no holes, into a triangle shape.
  2. Place in a greased baking pan, with the seam facing down.


  1. Brush the top of pastry with egg wash (beat lightly 2 egg yolks with 1 tablespoon of egg white together), sprinkle some sesame seeds over the top.
  2. Bake in preheated oven at 200C, about 25 minutes until golden brown.


Let pastry cool in pan on rack for 10 minutes and transfer to a wire rack to cool.


Best eaten while still warm with a pot of Chinese Tea!


Pastry is very flaky and crispy!


The multi layers of the crispy and tender pastry.


Yummy! Just pop into the oven for about 8 minutes at 150 degrees C to reheat for breakfast the next morning! 


The last time I made this was for a family outing. The filling can be made a couple of weeks in advance, just keep them in a container and store in the freezer section of the refrigerator. Thaw before use. To bake the pastry the next morning, make the ready-wrapped pastry with the filling the day before, do not apply any egg yolk at the top, just place them in a container in a single layer, keep them refrigerated overnight. Instead of triangle, these can be made into a round, rectangle or square pastry. The next morning, remove them from the fridge, leave them on the kitchen counter for about 20 minutes or so,   heat up the oven while waiting, brush the pastry with egg yolk, sprinkle with sesame seeds and proceed with the baking. Perfect for a picnic!

I'm submitting this to
Aspiring Bakers #10: Easy as Pie (August 2011), hosted by Janine of Not the Kitchen Sink!

And also sharing this with :
Bake with Bizzy at Bizzy B. Bakes


Barbecue Chicken Pastry
(adapted from "Irresistible Pastry" by Alex Goh)
Ingredients
Filling
A)
2 tbsp oil
2 cloves garlic, crushed
1 tbsp bean paste


(B)
400gm chicken meat, diced
1/2 tsp salt
1/2 tsp pepper
35gm sugar
1 tbsp oyster sauce
1 tbsp dark soy sauce
1 tbsp light soy sauce
1/2 tsp sesame oil


(C)
100gm water


(D)
1 tbsp potato starch
2 tbsp cornflour
50gm water


Water Dough
200gm flour
40gm shortening
20gm oil
40gm sugar
100gm water


Oil Dough
200gm flour
130gm shortening


Method :
Filling : Mix (B). Set aside for 1 hour. Heat the oil. Add in garlic and bean paste. Stir fry until fragrant. Add in (B) and cook until the chicken becomes white. Add in (C) and cook until it boils. Add in premix (D) and cook until it thickens. Dish up and leave it to cool. Keep in the freezer for 1 hour.


Water Dough : Mix all ingredients to form a smooth dough. Divide it into 20 equal parts.


Oil Dough : Mix all ingredients to form a paste. Divide it into 20 equal parts.


  1. Wrap the Oil Dough with Water Dough. Flatten the dough and roll it up twice. Flatten the dough and wrap in the filling. Seal to form a triangle shape.
  2. Place the seam downward onto a greased baking pan. Egg wash twice and sprinkle some sesame seeds on top. Bake at 200C for 25 minutes.

(As you can see, the instructions from pastry chef Alex Goh, is VERY BRIEF and may seem confusing. His recipes are good, but his instructions are not! In his book, there are only two photos illustrating the wrapping of the filling. I hope the steps that I've shown will help in some way or other! )


Monday, August 29, 2011

Nectarine Cake with Cinnamon-Nut Topping : Free and Easy Bake-Along #8

Together with my baking buddies, Lena and Zoe, we baked this Nectarine Cake for our Free and Easy Bake-Along #8. How does this cake fare? Delicious! I love it!


Gorgeous rosy nectarines.


We are not sure whether it was an error in the sugar ingredient for the topping, at least the three of us thought so! :)  In the ingredient listing, the amount of sugar was listed as 1 cup plus 1 tablespoon, whereas in the instruction for mixing the topping, only calls for 1 tablespoon! We guess that 1 cup of sugar for the topping is way too much! Zoe was the first to bake this, and alerted us on the sweetness even after she reduced the sugar. Thanks, Zoe!


Since I do not like sweet cakes and always reduced the sugar in most recipes, I did as I always do, reduced the sugar, especially after Zoe informed us that it is very sweet! I only use 2 tablespoons for the topping and 80gm for the cake batter. It was perfect for me. The smell is wonderful, the sweet aroma of the cinnamon fills the house when this cake is baking.


The topping is really nice, the walnuts coated with the sugar and cinnamon is so good. The cake balances well with the topping and the soft nectarine, which I left unpeeled.


Overall rating, this is a delicious cake! It did not last long in my house! Baked this in the evening and finished it all by the next morning!


Do drop by Lena of Her Frozen Wings and Zoe of Bake for Happy Kids to see their version of this cake. For our next Bake-Along, we will be baking Sweet Potato Sandwich Rolls  from King Arthur Flour website, and we will be posting it, on 10/09. 


Nectarine Cake with Cinnamon-Nut Topping
(adapted from "Cake Keeper Cakes" by Lauren Chattman)
For The Topping :
1 cup plus 1 tablespoon sugar (guess this is an error! I only use 2 tablespoons sugar)
1/2 teaspoon ground cinnamon
1/3 cup walnuts or pecans, finely chopped


For The Cake :
1 cup unbleached all-purpose flour
1 teaspoon baking powder
1/4 teaspoon salt
1 cup sugar (I use 80gm)
1/2 cup (1 stick) unsalted butter, softened
2 large eggs
1/2 teaspoon pure vanilla extract
5 medium ripe nectarines, halved, pitted and peeled


Make The Topping :
  1.  Preheat the oven to 375F. Grease the inside of a 10-inch round springform pan.
  2. Combine 2 tablespoons sugar, the cinnamon, and the nuts in a small bowl. Set aside.

Make The Cake :
  1. Combine the flour, baking powder and salt in a medium mixing bowl.
  2. Combine the sugar and butter in a large mixing bowl and cream with an electric mixer on medium-high speed until fluffy, about 3 minutes, scraping down the sides of the bowl once or twice as necessary. With the mixer on low, add the eggs one at a time, scraping down the sides of the bowl after each addition. Stir in the vanilla. Add the flour mixture, 1/2 cup at a time, scraping down the sides of the bowl after each addition.
  3. Scrape the batter into the prepared pan and smooth the top with a rubber spatula. Arrange the nectarines, cut side down, on top of the batter. Sprinkle with the topping. Bake the cake until it is golden and a toothpick inserted in the center comes out clean, 50 to 55 minutes. Let the cake cool in the pan on a wire rack for 10 minutes. Release the sides of the pan and use a large spatula to slide the cake from the pan bottom to a wire rack. Cool completely, cut into wedges, and serve. (I did have a problem sliding the cake from the pan bottom, so I just let it cool completely in the pan. It turned out fine).
  4. Store uneaten cake in a cake keeper or wrap in plastic and store at room temperature for up to 2 days.

I would like to wish all my Muslim blogger friends "SELAMAT HARI RAYA ADILFITRI", and everyone "HAPPY HOLIDAYS"
Have a safe 'balik kampung' journey and see you when you get back!

*****************


Saturday, August 27, 2011

Nyonya Stir-Fried Long Beans with Shrimp Paste

My mom used to cook this when we were young, taught to her by her Nyonya mother. Like most things in life, this simple dish was taken for granted without any much thought, it is just a dish that we love to eat, without realizing how special and valuable it is  until much later, when we are much older and have family of our own. How could a simple dish like this with only four ingredients can taste so wonderful, at least to me it is. Just like how my  mom used to prepare the ingredients, by pounding, using a mortar and pestle, I now do the same.  I have tried blending the ingredients in a blender before, somehow the taste is not quite as tasty. You can say it's all in the mind, but to me it is just not the same! Modern gadgets definitely cuts the work by half, but it does not necessarily mean they give the same results! I guess that every household in Malaysia, no matter the race, would definitely have a set of mortar and pestle in the kitchen, admist all the modern kitchen appliances.


This is how I pound the garlic, onions and shrimp paste. Put a third of the garlic, onions and shrimp paste into the mortar and pound away. Pounding the shrimp paste together with the onions and garlic will help to absorb the juice from the onions and garlic and preventing the juice from splattering out (and gets into your eyes!). When it has been pounded to a coarse paste, add another third of the ingredients, pound and repeat with the remaining portion. This way, the chopped garlic and onions will not be popping out of the mortar as you pound. Or you may crush the chopped onions and garlic with the pestle before you start to  pound. Pound until the paste is coarsely fine. 


Now I cook this for my family, and they love it as much as I do. 


Unlike other stir-fries veggies where they are best eaten hot right after cooking, I prefer to eat this barely warm or at room temperature.


A simple, delicious dish that really complements well with plain white rice or even plain porridge.


I am sharing this with
Heritage Food Trail at Precious Moments
Vintage Recipe Thursday at Joy of Desserts
Full Plate Thursday at Miz Helen's Country Cottage


Nyonya Stir-Fried Long Beans with Shrimp Paste
(by kitchen flavours)
400gm long beans
8-10 shallots, chopped coarsely
4 cloves garlic, chopped coarsely
25-30gm shrimp paste
salt to taste
1/2 cup water
3-4 tbsp cooking oil
  1. Cut long beans to 2" lengths.
  2. Pound shallots, garlic and shrimp paste together. Paste need not be pounded until very fine.
  3. Heat oil in wok, swirl oil over sides of wok. When oil is hot, add in pounded ingredients, stir-fry over medium heat until paste is light brown and fragrant, this would take about 4-5 minutes.
  4. Add in long beans and stir to combine. Add in water, stir and cover, turn heat to medium low and simmer, stirring occasionally, adding some water if appears dry. Add salt to taste, go easy on the salt as the shrimp paste is usually salty. Continue to simmer, covered, stirring now and then,  for about 10 minutes until long beans has softened.
  5. Dish out to a serving plate.


Wednesday, August 24, 2011

Balinese Chili Squid

Do you like squids? We do!  Absolutely love squids. But one thing that I really hate doing, is cleaning them! It is a messy and "smelly" job, but someone got to do it!! And once they are cooked, yum! Squids are great in just about any way they are done, either deep-fried in batter, in spicy dishes like sambals or curries, in stir-fries, in BBQ, great as a pizza topping too or anything that you can think of. Bought some fresh squids from the morning market and thought of something spicy but mild enough that my kids can enjoy it too. Found the perfect recipe in one of my cookbooks, Stir Fry.


This is a lovely dish, perfect with white rice. It is not spicy, mild enough that my kids really enjoy it. The recipe requires 1/4 cup of lime juice, which I think is too much and would be too sour for my liking, as tamarind paste is also used for this dish. I only use the juice of two calamansi limes, and it is just right with about 3/4 tablespoon of tamarind paste. 


I was tempted to use a big bunch of Thai basil leaves from my garden, but my hubby do not really like the smell of this leaves, so I only use about 8 pieces. Which is great, as there is a light aroma of the leaves without being overpowering. The recipe calls for 1 cup of chicken stock, but I did not use it at all, as when the squid was stir-fried, there's enough juices from the squid, and this is a fairly dry dish, from the photo in the book. And I think by boiling the squid with the chicken stock for a couple of minutes will overcook them, making them tough. But then I'm giving the recipe as it is, feel free to follow the original.


A delicious dish that will definitely be repeated again in my kitchen. Yum!

I'm sharing this with :

Hearth and Soul Hop at Mom's Sunday Cafe
Full Plate Thursday at Miz Helen's Country Cottage


Balinese Chili Squid 
(adapted from "Stir Fry)
750gm (1 lb 10oz) squid tubes
60ml (2fl oz/1/4 cup) lime juice (I use the juice from 2 calamansi limes)
3 tablespoons vegetable oil
1 large red chili, seeded and sliced
3 spring onions (scallions), sliced, plus extra finely shredded spring onion, to garnish
1 tablespoon tamarind concentrate (I just use about 3/4 tablespoon)
1 lemongrass stem, white part only, finely sliced
250ml (9fl oz / 1 cup) chicken stock (I did not use this at all)
5 Thai basil leaves, shredded


Spice Paste
2 large red chilies, seeded and chopped
2 garlic cloves, chopped
2 cm (3/4 inch) piece fresh ginger, chopped
2 cm (3/4 inch) piece fresh turmeric, chopped
3 spring onions (scallions), chopped
1 tomato, peeled, seeded and chopped
2 teaspoons coriander seeds
1 teaspoon shrimp paste

  1. Score the underside flesh of the squid in a fine criss-cross pattern and cut into large pieces. Place in a bowl with the lime juice and season well.
  2. To make the spice paste, grind the chili, garlic, ginger, turmeric, spring onion, tomato, coriander seeds and shrimp paste in a food processor.
  3. Heat 2 tablespoons of the oil in a wok. Cook the squid, chili and spring onion in batches for 2 minutes over high heat - don't overcook the squid. Remove from the wok. 
  4. Heat the remaining oil and add the spice paste, tamarind concentrate and lemongrass. Cook, stirring, over medium heat for 5 minutes.
  5. Return the squid to the wok and add the stock. Season with pepper and add the basil. Bring to the boil, then reduce the heat and simmer for 2 minutes. Serve immediately, garnished with the extra spring onion. (For this step, I just add the squid and the juices into the wok, season with pepper and add the basil, give a couple of turns in the wok for 1 to 2 minutes and dish out to a serving plate).


Monday, August 22, 2011

Lychee Ice Cream

One of my favourite fruits in creamy yumminess! You got to try this. Do not have any fresh lychees available? No problem, this delicious Lychee Ice Cream is made from the canned lychees, how about that for convenience? Another bonus is, there's no egg yolks used in this recipe. Even better!


This recipe is from an ice cream book "Scoop" by Ellen Brown. There are not many pictures in this book, but lots of delicious recipes that I can't wait to try. "Scoop" is all about the best flavour recipes from America's favourite ice cream shops. Lychee Ice Cream was adapted from Mitchell's San Francisco, CA. This is a great book to have if you are an ice cream lover, even if you've already own "Perfect Scoop" by David Lebovitz, as the recipes in "Scoop" are totally different with many delicious combination of flavours. 


There's no egg yolks in this ice cream, but contains some cornflour as a thickener. And there's no additional sugar, as the sweetness comes from the corn syrup and the syrup from the canned lychees. I got more than a quart of churned ice cream, and got to divide the cooled mixture (before churning) to churn it twice, as my ice cream maker can only churn a quart of ice cream at a time. The first churn took almost 45 minutes and it is still not getting any thicker, so I just went ahead to freeze it. I then freeze the churning bowl overnight and churned the second batch the next day.  The ice cream turns out  delicious, with delightful lychee flavour. Ellen Brown describes this as "light and luscious ice cream".  A definite keeper and will be repeated again and again!

Lychee Ice Cream
(adapted from "Scoop" by Ellen Brown)
2 (15-ounce) cans lychee fruit, drained with syrup reserved
1-1/4 cups heavy whipping cream
1/3 cup light corn syrup
1/8 teaspoon kosher salt
1/2 cup whole milk
2 tablespoons corn starch
2 tablespoons nonfat dry milk powder
2 teaspoons freshly squeezed lemon juice
1/4 teaspoon pure vanilla extract

Pour the reserved syrup from the lychee fruits into a saucepan and bring to a boil over medium-high heat. Reduce the heat to low, and simmer the syrup until reduced by two-thirds.

Add the cream, corn syrup, and salt to the saucepan. Cook over medium heat, stirring frequently, until the mixture begins to steam; watch it carefully and make sure it does not come to a boil.

While the mixture heats, combine the milk, cornstarch, milk powder, lemon juice, and vanilla extract in a small bowl, and stir until smooth and both of the powders have dissolved.

Add the cornstarch mixture to the pan, and bring to a boil over low heat. Whisk until smooth, and simmer the mixture for 2 minutes, or until thickened. If the mixture is lumpy, strain it through a sieve.

Look over the lychee fruits carefully to make sure that all traces of the pits and tough shells have been discarded. Puree the lychee fruits with 3/4 of the custard in a food processor fitted with the steel blade or in a blender. Stir the puree back into the saucepan.

Transfer the hot liquid to a storage container and press a sheet of plastic wrap directly onto the surface of the mixture to prevent a skin from forming. Refrigerate the mixture uncovered until it is completely chilled (below 40F), or quick-cool it (refer **).

Freeze the mixture in an ice cream maker according to the manufacturer's instructions. Serve immediately for a soft ice cream, or transfer the mixture to an airtight storage container and freeze until hard. Allow the ice cream to sit at room temperature for 15 minutes before serving if frozen solid.

 **
While the custard is heating, chill a metal mixing bowl in the freezer, and have a larger mixing bowl into which the chilled one will fit when the larger bowl is filled with ice. Then you're going to replicate the environment of an old-fashioned cranked ice cream maker by placing ice cubes and salt in the larger bowl, and stirring the custard in the smaller bowl set over the ice until it has chilled. You must be careful, however, as the ice melts, that you do not inadvertently get salty ice water into the custard.


Saturday, August 20, 2011

Lemon Curd Tart

I have a quarter jar of homemade lemon curd left and was looking for recipes to use it for, instead of licking it off the spoon! :) Found this perfect recipe but I did make some changes to it. Firstly this recipe calls for curd cheese, I'm not even sure I've seen it before, so I just substitute with cream cheese. 


These are originally made in small mini mufiins pan or cupcake tins. I used the tart tins with daimeter of 3", and got about 15 tarts instead of 24 mini small tarts. According to the author, "These tasty little tarts are a popular tea-time treat in the North of England. They have a curd cheese and currant filling on a tangy layer of lemon curd."


The pastry is on the crunchy side and not as buttery soft as I expect it to be. But overall, this is a nice tart to have as a tea-time snack with a cup of tea. The lemon curd is so tangy and the sourness really pairs well with the cream cheese.


The tangy lemon curd!


The raisins add a lovely touch to the tangy tart.


I'm submitting this to :


LEMON CURD TARTS
(adapted from "Pastry Cook" by Catherine Atkinson)
Makes twenty-four
Ingredients
225gm/8oz/1 cup curd (farmer's cheese) (I use cream cheese)
2 eggs, beaten
75gm/3oz/6 tbsp caster (superfine) sugar
5ml/1tsp finely grated lemon rind
50gm/2oz/1/4 cup currants
60ml/4 tbsp lemon curd
thick cream, to serve


For the pastry
275gm/10oz/2-1/2 cups plain (all-purpose) flour
pinch of salt
75gm/3oz/6 tbsp butter, diced
50gm/2oz/1/4 cup lard or white vegetable fat
60ml/4 tbsp chilled water (I use abt 5-6 tablespoons)

  1. To make the pastry, sift the flour and salt into a mixing bowl. Rub or cut in the fat until the mixture resembles fine breadcrumbs. Sprinkle the water over the dry ingredients and mix to a dough. Knead on a lightly floured surface for a few seconds until smooth. Chill.
  2. Preheat the oven to 180C/350F/Gas 4. Roll our the pastry thinly, stamp out 24 rounds using a 7.5cm/3in plain pastry cutter and use to line a mini muffin or cupcake tins. Chill until required.
  3. Cream the curd cheese with the eggs, sugar and lemon rind in a bowl. (I beat the cream cheese until smooth and add in eggs, sugar and lemon rind, continue creaming till smooth). Stir in the currant. Place 2.5ml/1/2 tsp of the lemon curd in the base of each tartlet case. Spoon on the filling, flatten the tops and bake for 35-40 minutes until just turning golden. Serve warm or cold, topped with thick cream.


Wednesday, August 17, 2011

Fried Fish with Crispy Fried Ginger

Bought a piece of Black Promfret from the morning market and undecided what to do with it! After changing my mind a couple to times (I'm so fickle-minded sometimes!), I finally just settled for a simple dish of fried fish with crispy fried ginger and sweet soy sauce. A family favourite.  We would sometimes have this dish in Chinese restaurants. It is cheaper to have it at home and healthier too, I use canola oil. Other than Promfret, other suitable fish would be Tillapia, Garoupa, Threadfin and any fish that is suitable for frying. 


Fry the fish till really crispy and brown. I just love the smell of crispy fried fish! Yum!


If you are a ginger nut like me, use as much ginger as you want. Julienned ginger is fried till light brown and crispy. Instead of ginger, thinly sliced garlic may be used. Just fry the sliced garlic till crispy. Or you can have the best of both worlds, garlic and ginger, but they need to be fried separately, you can mix them up later. Soy sauce is sweetened with a little sugar in the hot oil and pour over the fish. Garnish with the crispy ginger and serve immediately. Really yummy! Give this dish a try, I'm very sure that you will enjoy it! Kids will especially love the crispy fish! Be careful with the bones when serving to children! 


Fried Fish with Crispy Fried Ginger
1 black promfret
1/2 cup julliened sliced ginger (or more!)
3/4 cup oil for frying
3 tablespoons light soy sauce
1 teaspoon sugar
  1. Clean fish, pat dry. Heat oil in wok, coating sides of wok with oil. When oil is smoking hot, gently release fish in oil. Fry over medium heat on both sides till brown and crispy. Make sure fish is crispy. Remove to a serving heat-proof plate.
  2. In same oil, fry julliened ginger (or thinly sliced garlic) till brown and crispy. (Take care not to burn the ginger as it will be bitter). Remove to a small plate or bowl and keep aside.
  3. Remove excess oil from wok, retaining about 2-3 tablespoons in wok. Turn off heat. Add in sugar and soy sauce. It will sizzle. Stir until sugar is melted, about 15 seconds or so. Pour soy sauce and oil mixture on fish, garnish with crispy fried ginger and serve immediately. Really delicious when eaten while the fish and ginger is really crispy. 


Monday, August 15, 2011

Coca-Cola Chocolate Cake : Free And Easy Bake-Along #7

I have always been curious by cakes with Coca-Cola, 7-Up or even lemonade as one of its ingredients. So I was glad when this cake was chosen for our Bake-Along. This cake is full of chocolate flavour, it contains a whopping 3/4 cup of cocoa powder, which I think cocoa powder always gives a better chocolate flavour than chocolates.


The texture of this cake is dense, heavy, and fudgy but  soft and moist with a chocolaty taste. I was surprised to see that the outer crust layer is thicker than other cakes I've baked and kinda chewy. It is a nice contrast, as you bite into it, first you could feel the thick layer of the crust and then the soft fudgey chocolaty cake inside. I could not however taste any Coca-Cola at all. I guess the flavour has diminished in the baking process! As usual, I reduced the sugar, there is a lot of sugar in this recipe, and Coca-Cola alone contains more sugar than you need! I'm really glad I did reduce the amount of sugar, you can actually taste the sweetness even after it was reduced.


This cake tasted better the next day when the outer crust has softened and the flavours has matured overnight. I refrigerated the leftovers and it tasted good too when eaten cold from the fridge. According to Lauren Chattman, you could either underbake this cake so that some gooey, warm batter spilled out of the center of every slice. For a firmer cake, bake it at the recommended baking time. I baked mine for 55 minutes.


Let's visit Lena from Frozen Wings and Zoe from Bake For Happy Kids, to see their version of this cake. We shall be baking Nectarine Cake, also from "Cake Keeper Cakes" by Lauren Chattman, for our next Bake-Along and will be posting it on 29/08.

Coca-Cola Chocolate Cake
(adapted from "Cake Keeper Cakes" by Lauren Chattman)
Serves 10
1-3/4 cups unbleached all-purpose flour
1 cup granulated sugar (I use half cup)
1 cup packed light brown sugar (I use half cup)
3/4 cup unsweetened Dutch process cocoa powder
2 teaspoons baking powder
1/4 teaspoon baking soda
1/4 teaspoon salt
2 large eggs
1 cup sour cream (I use homemade yoghurt)
1/2 cup vegetable oil
1 cup Coca-Cola
1 teaspoon pure vanilla extract
confectioners' sugar for dusting

  1. Preheat the oven to 350F. Grease the inside of a 9-inch round springform pan.
  2. Whisk together the flour, granulated sugar, light brown sugar, cocoa powder, baking powder, baking soda and salt in a large mixing bowl. Whisk together the eggs, sour cream, oil, Coca-Cola and vanilla in a medium mixing bowl.
  3. With a wooden spoon, stir the Coca-Cola mixture into the flour mixture until just combined. Do not overmix.
  4. Pour the batter into the prepared pan. Bake until a toothpick inserted in the center of the cake comes out clean, 55 minutes to 1 hour.
  5. Set the pan on a wire rack and let cool for 5 minutes. Run a paring knife around the perimeter of the pan to loosen the cake from the pan sides, and release the sides. Use a large spatula to slide the cake from the pan bottom to a wire rack. Let cool completely. Dust heavily with confectioners' sugar, cut into wedges, and serve.
  6. Store uneaten cake in a cake keeper or wrap in plastic and store at room temperature for up to 3 days.

Saturday, August 13, 2011

Cucumber Pickle

Do you like pickles? I do, especially cucumber pickles. This jar of cucumber pickles is the second one that I've made. It was so good to snack on and is so easy and quick to put together.


This cucumber and onion pickles, well you may omit the onions if you want to, but if you are an onion nut like me, you will love it! The cucumber is so crunchy, and the onions are so "oniony" sweet and crunchy, that these are perfect to go with burgers or sandwiches. I would know, I've tried that too, with chicken burger, really good. If you love pickles in your sandwiches or burgers, this would be the one. Make a batch and I bet that it won't last long in the fridge. I finished mine mostly by snacking on them, every other day or so! I love it! 
My sister came for a week's stay over at my house, and she love this Cucumber Pickle. She's going to make a jar of this when she gets back home!


I've given the recipe as it is from the book. But really, it is just a matter of your own taste, you may add more sugar or less salt, it's up to you. For both times, I only made with one medium cucumber and one medium onion. Wash and wipe dry cucumber, cut to thin slices. Peel, wash and wipe dry the onion, cut to thin slices in rings. Put the cucumber in a bowl, pour in enough of cider vinegar or white wine vinegar to cover, add in salt and sugar to taste. Stir to mix well.  Place cucumber and sliced onions in random rows in a jar and pour the vinegar solution to cover. Store in the fridge. You can start enjoying it the very next day! Sweet, sour and crunchy! Yummy! Just as Rachel Allen says, "It is a true pickle, so even though it will lose its vibrant green colour, it will keep for weeks and weeks...."

CUCUMBER PICKLE
(adapted from "Rachel's Favourite Food At Home" by Rachel Allen)
900gm (2lb) unpeeled cucumber, thinly sliced
3 small onions, peeled and thinly sliced (optional)
350gm (12oz) sugar
1 tbsp salt
225ml (7-1/2fl oz) cider vinegar or white wine vinegar

Mix the cucumber and onion in a large bowl, add the sugar, salt and vinegar, and mix well to combine.
Make 1 hour ahead, if possible, and store in a jar or bowl in the fridge.


Tuesday, August 9, 2011

Lemon-Soaked Ginger Pound Cake

Ginger is one of the ingredient that is a necessity in my kitchen pantry. Love ginger, used it in many of my Chinese dishes, in curries and now in my baking pan. Lemon-Soaked Ginger Pound Cake is a lovely cake, recipe taken from "The Cake Book" by Tish Boyle.


This cake is full of ginger power! Three forms of ginger! There's ground ginger, grated ginger and crystallized ginger, all in one cake. After the cake is baked, it is brushed over with lemon-sugar syrup. The result is a lovely cake with a moist and soft texture. Will all the ginger in it, you would have thought that the taste would be too strong, but really, it's not, the taste of the ginger is just right, perfect as it is!


This is a nice cake to have with a cup of tea. 


Soft and moist.

I'm sharing this with
Cookbook Sunday over at Mom's Sunday Cafe
Hearth and Soul Hop over at Mom's Sunday Cafe
Sweet Tooth Friday over at Alli n Son
Bake with Bizzy over at Bizzy B. Bakes


Lemon-Soaked Ginger Pound Cake
(adapted from "The Cake Book" by Tish Boyle)
Makes one 10-inch Bundt cake, serves 12 to 14
Ginger Pound Cake
2-1/2 cups (10.7oz/302gm) all-purpose flour
1/2 cup (2oz/57gm) cake flour
2-1/2 teaspoons ground ginger
1/2 teaspoon baking powder
1/2 teaspoon baking soda
1/2 teaspoon salt
1 cup (2 sticks/8oz/227gm) unsalted butter, softened
1-3/4 cups (12.3oz/350gm) granulated sugar (I use 1 cup)
4 large eggs, at room temperature
2 tablespoons (1oz/30gm) grated peeled fresh ginger
1/2 cup (2.8oz/80gm) finely chopped crystallized ginger
2 teaspoons finely grated lemon zest
1 teaspoon vanilla extract
1 cup (8.5oz/242gm) sour cream (I use my homemade yoghurt


Lemon Syrup
1/3 cup (80ml) freshly squeezed lemon juice
2/3 cup (4.7oz/133gm) granulated sugar (I use 1/2 cup)


Garnish
Confectioners' sugar for dusting


Make The Cake :

  1. Position a rack in the center of the oven and preheat the oven to 350F. Grease the inside of a 10-inch Bundt pan. Dust the pan with flour.
  2. Sift together the flours, ground ginger, baking powder, baking soda, and salt into a large bowl. Set aside.
  3. In the bowl of an electric mixer, using the paddle attachment, beat the butter at medium speed until creamy, about 2 minutes. Gradually add the sugar and beat at medium-high speed until the mixture is light in texture and colour, about 3 minutes. Beat in the eggs one at a time, beating for 30 to 40 seconds after each one. Scrape down the sides of the bowl as necessary. Beat in the grated ginger, crystallized ginger, lemon zest, and vanilla extract. At low speed, add the sifted mixture in three additions, alternating it with the sour cream in two additions. Scrape the batter into the prepared pan and smooth the top with a spatula.
  4. Bake the cake for 50 to 55 minutes, or until a toothpick inserted in the centre comes out clean. Cool the cake in the pan on a cooling rack for 10 minutes, then invert it onto another rack. Place the cake, on the rack, over a baking sheet.
Meanwhile, make the Syrup :
  1. Combine the lemon juice and sugar in a small nonreactive saucepan and cook over medium heat, stirring, until the sugar dissolves, 3 to 4 minutes. Remove the pan from the heat. Using a pastry brush, dab the syrup generously all over the surface of the warm cake, allowing it to soak into the cake before reapplying. Dab any syrup that has dripped onto the baking sheet onto the cake. Let the cake cool completely.
  2. Dust the top of the cake with confectioners' sugar just before serving.
Store in an airtight container at room temperature for up to 4 days, or refrigerate for up to a week.


Saturday, August 6, 2011

Fresh Mint Ice Cream with Fudge Ripple

This is so good! The creamiest and the most delicious Mint Ice Cream I've tasted. Really, I'm not kidding! There's no mint extract or flavouring at all, the powerful delicious minty taste comes from the fresh mint leaves! And these wonderful leaves comes from my own potted garden. I just love the minty smell, I can even smell the mint when I'm watering my plant, and I would linger a little longer by the pot, just so I could breathe in the sweet minty smell, really nice! 


Fresh Organic Mint Leaves from my garden, smell so good! 

This Fresh Mint Ice Cream recipe is none other than David Lebovitz's. My daughter has been asking for Mint Ice Cream, her favourite flavour, and I was waiting for the right time to harvest my mint. I only have a pot, but it is enough to churn out this delicious ice cream. It is really, really creamy and so full of mint flavour! I made a batch of Chocolate Fudge Ripple, another one of David's recipe from the same book, and just layered it with the ice cream before freezing. The result, is one delicious Fresh Mint Ice Cream with Fudge Ripple! According to David, when the mint leaves are soaked in the warm milk and cream mixture, the mixture would turn a lovely shade of emerald. That does not happen to mine, in fact, there's almost no colour at all, just a light tinge of green, and can't be seen from the photo. But that's alright, it's not important at all, the important thing is, it is so FULL of mint flavour! Yummy..!


Fudge Ripple, this is really good too!


The ice cream is so creamy that it can be scooped right out of the freezer. There's  no need to take it out earlier to soften it.


Melting yumminess! Melts real fast!

I'm sharing this delightful ice cream with Cookbook Sunday over at Mom's Sunday Cafe when the link opens on Sunday. Are you cooking or baking anything from any of your cookbooks? I love doing just that, baking and cooking from my many cookbooks, and Cookbook Sunday is the perfect place to share. See you there.

I'm linking this to :
Full Plate Thursday over at Miz Helen's Country Cottage
Recipe Swap Thursday over at Prairie Story
Vintage Recipe Thursday over at Joy of Desserts
Sweet Tooth Friday over at Alli n Son
Sweets For A Saturday over at Sweet As Sugar Cookies
Cookbook Sunday over at Mom's Sunday Cafe


FRESH MINT ICE CREAM
(adapted from "The Perfect Scoop" by David Lebovitz)
1 cup (250ml) whole milk
3/4 cup (150gm) sugar ( I use 1/2 cup)
2 cups (500ml) heavy cream
Pinch of salt
2 cups (80gm) lightly packed fresh mint leaves
5 large egg yolks (I use 4)


Warm the milk, sugar, 1 cup (250ml) of the cream, and salt in a small saucepan. Add the mint leaves and stir until they're immersed in the liquid. Cover, remove from the heat, and let steep at room temperature for 1 hour.
Strain the mint-infused mixture through a mesh strainer into a medium saucepan (the milk will be a lovely shade of emerald). Press on the mint leaves to extract as much of the flavour as possible, then discard the mint leaves. Pour the remaining 1 cup (250ml) heavy cream into a large bowl and set the strainer on top.
Rewarm the mint-infused mixture. In a separate medium bowl, whisk together the egg yolks. Slowly pour the warm mint liquid into the egg yolk, whisking constantly, then scrape the warmed egg yolks back into the saucepan.
Stir the mixture constantly over medium heat with a heatproof spatula, scraping the bottom as you stir, until the mixture thickens and coats the spatula. Pour the custard through the strainer and stir it into the cream. Stir until cool over an ice bath.
Chill the mixture thoroughly in the refrigerator, then freeze it in your ice cream maker according to the manufacturer's instructions.


FUDGE RIPPLE
(adapted from "The Perfect Scoop" by David Lebovitz)
1/2 cup (100gm) sugar
1/3 cup (80ml) light corn syrup
1/2 cup (125ml) water
6 tablespoons (50gm) unsweetened Dutch-process cocoa powder
1/2 teaspoon vanilla extract

Whisk together the sugar, corn syrup, water, and cocoa powder in a medium saucepan. Heat over medium heat, whisking constantly, until the mixture begins to bubble at the edges.
Continue to whisk until it just comes to a low boil. Cook for 1 minute, whisking frequently. Remove from the heat, stir in the vanilla, and let cool. Chill in the refrigerator before using.

Mixing It In : The Fudge Ripple should be thoroughly chilled, as it's easiest to use when very cold. Just before you remove the ice cream from the machine, spoon some of the Fudge Ripple onto the bottom of the storage container. As you remove the ice cream from the machine, layer generous spoonfuls of the sauce between layers of ice cream. Avoid stirring the Fudge Ripple, as it will make the ice cream muddy looking.

Storage : Fudge Ripple can be stored for up to 2 weeks, covered, in the refrigerator.

Variation : To make Mocha Ripple, substitute strongly brewed espresso for the water in the recipe, or stir in 1 tablespoon of best-quality instant coffee granules after you boil the mixture.